Archiving a Google Classroom is essential for keeping your digital learning environment organized, especially when a school year or term ends. Doing this without losing critical data ensures that all valuable class content, assignments, and student progress are securely preserved for future reference.
The process is straightforward yet vital in maintaining order and accessibility and all of it can be done in simple steps.
This guide will show you how to archive your Google Classroom effectively while keeping everything you need intact and ready for retrieval.
Steps to Archive a Google Classroom
| 1. Open Google Classroom Settings | Access the Google Classroom homepage and click on the three dots next to the class. |
| 2. Select the Class to Archive | Choose the class you want to archive from the list. |
| 3. Confirm the Archive Action | Click on “Archive” and confirm the action in the pop-up. |
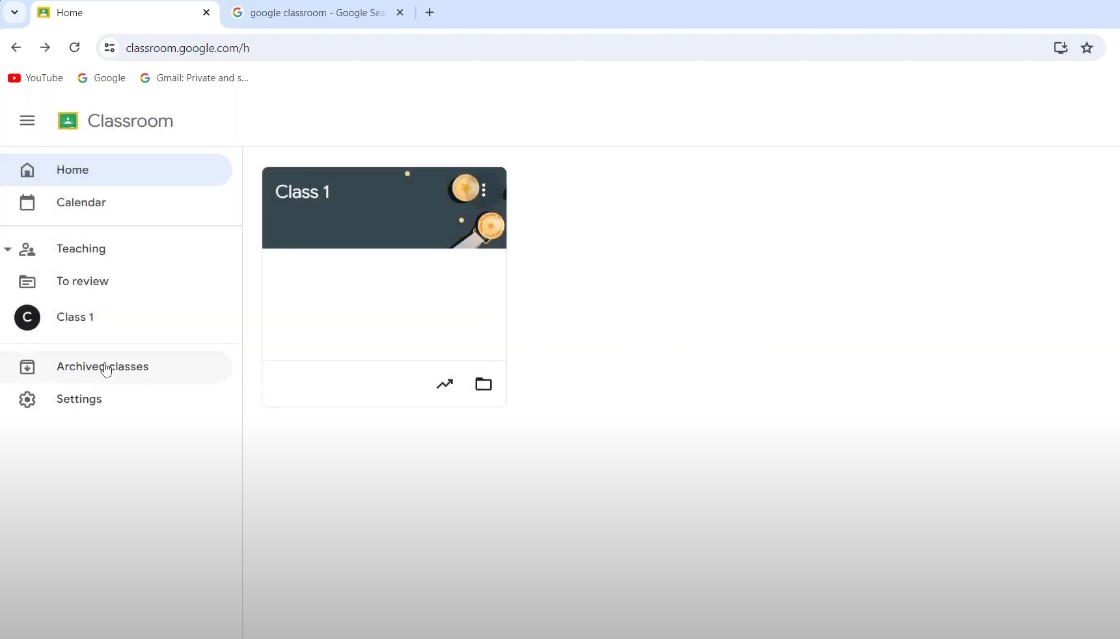
| 4. Access Archived Classes | Go to the menu and select “Archived Classes” to view them. |
| 5. Restore Archived Classes (If Needed) | Click “Restore” to bring back an archived class to your active list. |
| 6. Reuse Content from Archived Classes | Select specific assignments or posts to reuse in future classes. |
1. Open Google Classroom and Access Settings
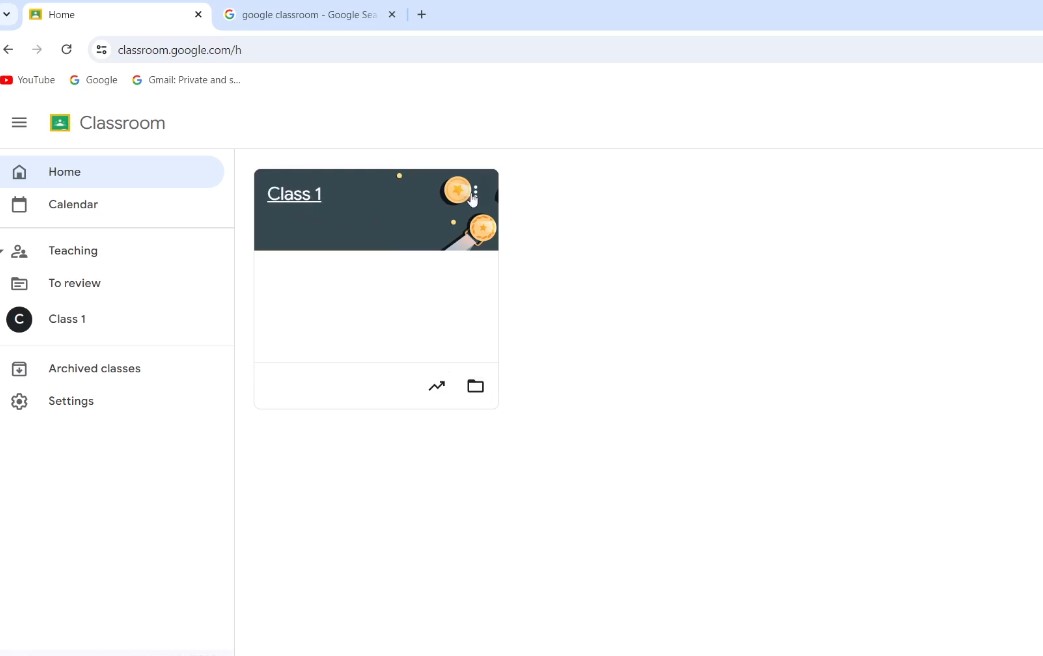
Start by logging into your Google Classroom. The process kicks off on your homepage where all your classes are listed.
Steps
| Steps | Description |
|---|---|
| Sign In to Google Classroom | Go to Google Classroom and ensure you’re logged into the correct account. Your dashboard will display all your active classes. |
| Identify the Class to Archive | Find the class you want to archive in your list of classes. Double-check to make sure it’s the right one. |
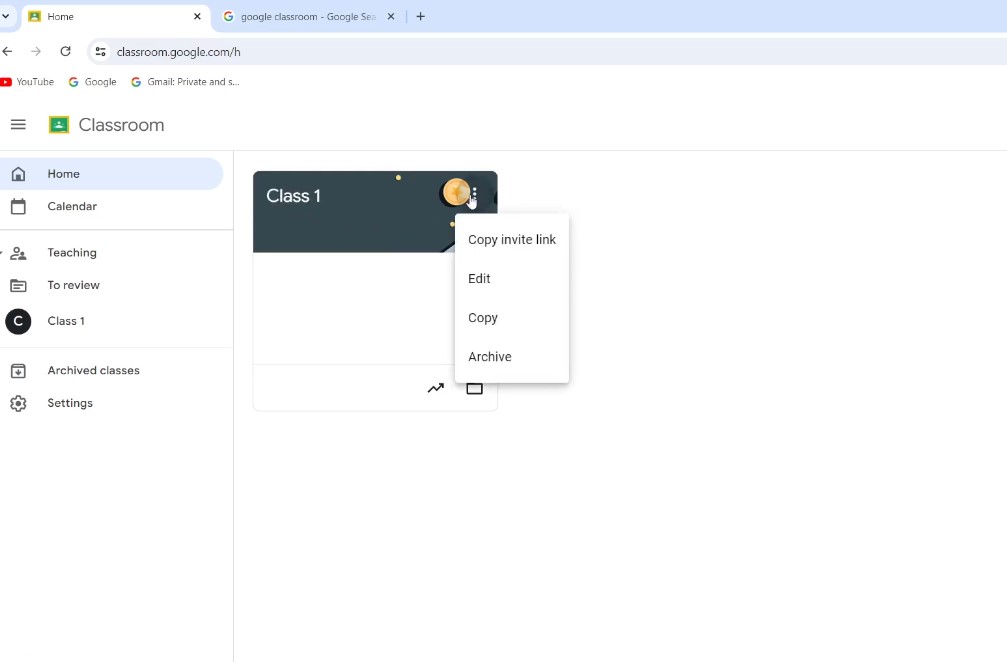
| Click the Three Dots (More Options) | To the right of each class name, there’s a button with three vertical dots. Click this button to access more options. |
| Choose “Archive” | After clicking the three dots, a dropdown menu appears. Select “Archive” from the options and confirm your choice when prompted. |
Why It Matters?
Archiving classes is essential for maintaining an organized digital workspace. At the end of the semester or after finishing a course, archiving lets you clear out classes you no longer need to actively manage, helping you focus on current responsibilities.
It creates a cleaner, more manageable interface so you can easily access and prioritize active classes.
Archiving old classes helps prevent confusion for both you and your students. By removing inactive classes from your main view, you avoid accidentally opening or referencing outdated material.
For students, this eliminates the chance of them mistakenly revisiting old assignments or announcements, keeping their attention on the present curriculum.
Keep in Mind
Archiving a class doesn’t automatically remove student access. Students can still view archived classes and access content unless you unenroll them first. If you want to completely restrict their access, consider unenrolling them prior to archiving the class.
Archived classes may still have assignments linked to your Google Calendar, meaning reminders and deadlines could continue appearing even though the class is inactive. To avoid unnecessary notifications, you can hide or delete these calendar reminders, ensuring your schedule reflects only current assignments and deadlines.
2. Select the Class You Want to Archive
Now that you’re in Google Classroom and have accessed the settings, it’s time to choose the specific class you want to archive. This step is simple, but getting it right is crucial.
Steps
| Step | Action | Description |
|---|---|---|
| Locate the Class | Scroll through the list of classes on your homepage. | Identify the class you want to archive. Ensure it’s the correct class, especially if you have multiple classes with similar names. |
| Click the Three Vertical Dots | Click the three vertical dots next to the class name. | This opens a dropdown menu with various options. |
| Double-Check Before Proceeding | Confirm your selection. | Make sure you’re archiving the correct class. Once archived, it won’t appear in your active classes list but can be restored later. |
Examples
At the end of a semester or once you’ve finished teaching a particular subject, archiving that class can help you maintain a clean, focused workspace. Archiving stores everything safely for future access, allowing you to move on with your current classes without losing any past materials or records.
When your dashboard becomes cluttered with too many active classes, archiving offers a quick way to declutter. It keeps your interface streamlined by removing inactive classes, while also preserving the class content, assignments, and resources for easy reference later on.
Quick Tips
Before archiving, make sure each class is clearly labeled with identifying information, such as the semester, year, and subject (e.g., “History 2024 – Term 1”). Consistent naming conventions make it easier to find the correct class when browsing through archived material, preventing confusion and ensuring efficient access when you need it.
Take a moment to check each class for any final grading tasks or assignments that need to be returned to students. This ensures all work is completed and feedback is provided before archiving, preventing any loose ends. By finalizing grades and reviews first, you can archive with confidence, knowing the class is fully wrapped up.
3. Confirm the Archive Action
After selecting the class you want to archive, the next step is to confirm the action. This is the moment where you officially archive the class and ensure everything is securely stored away.
Steps
| Step | Action | Description |
|---|---|---|
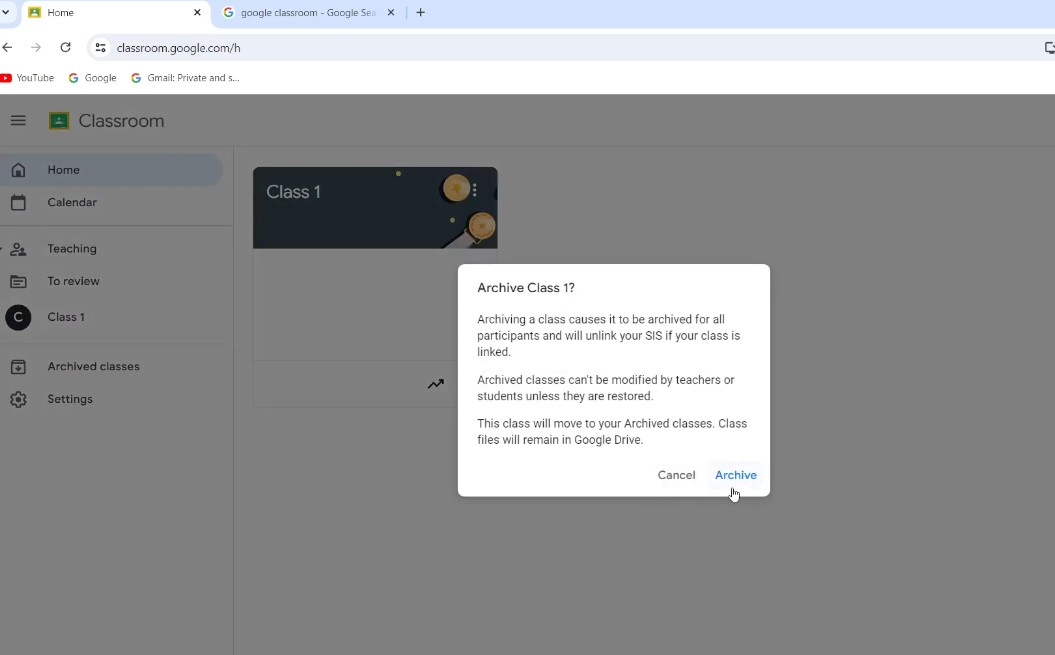
| Click on “Archive” | Select “Archive” from the dropdown menu. | After clicking the three vertical dots, choose “Archive.” A confirmation pop-up will appear. |
| Review the Pop-Up Information | Read the information in the pop-up. | The pop-up explains that once archived, the class can’t be actively edited or accessed from the main dashboard. However, it will still be stored in your archived classes and can be restored anytime. |
| Confirm the Action | Click “Archive” in the confirmation box. | This final step completes the archiving process, effectively removing the class from your active view. |
Why it Matters?
Archiving a class is reversible, meaning you can restore it if necessary, but it’s important to double-check before archiving to avoid any disruption. Confirming before archiving ensures you don’t accidentally hide a class that’s still in use, sparing you the hassle of restoring it and keeping your workspace seamless.
Archiving is a powerful tool for keeping your active classes uncluttered and streamlined. Once archived, the class is moved to a separate section, which makes it easier to focus on the classes that require your attention. This separation enhances your organizational flow, helping you maintain a workspace tailored to your current priorities.
Quick Reminders
After archiving, the class will disappear from your main Classes page, effectively reducing clutter. Students also won’t have the option to unenroll themselves, preserving the class’s structure if you ever decide to revisit it.
Importantly, all content, including posts, assignments, and announcements, remains intact within the archived section, ready to access whenever needed.
The option to archive is particularly valuable at the end of a school year, semester, or anytime you want to temporarily set a class aside. Archiving classes that are no longer active ensures they are stored neatly without requiring immediate access, making it an efficient feature for managing the ebb and flow of your teaching schedule.
4. Access Archived Classes
Now that your class is archived, knowing how to access it when needed is essential. Archived classes are safely stored but are no longer visible on your main dashboard. Let’s dive into how you can view and manage these classes.
Steps
| Step | Action | Description |
|---|---|---|
| Open Google Classroom and Access the Menu | Locate the three horizontal lines (Menu) at the top left corner of the Google Classroom homepage. | Click on the Menu to open a sidebar with various options. |
| Select “Archived Classes” from the Menu | In the sidebar, find the “Archived Classes” option. | Click on “Archived Classes” to view all your previously archived classes. |
| Browse Your Archived Classes | Access the archived section. | View a list of all the classes you’ve archived, each with its content intact, including assignments and announcements. |
Why is This Step Important?
Archiving a class doesn’t mean it’s gone forever, it’s about keeping things orderly. This step ensures you can easily retrieve archived classes and their content whenever needed. By having a designated space for past classes, you can quickly access any assignments, resources, or discussions from previous courses.
It is especially helpful when you want to reference specific materials, adapt assignments, or check on student progress over time.
Archived classes serve as valuable resources when planning future lessons or structuring similar topics for upcoming courses. By revisiting these classes, you can assess what worked well, refine lesson plans, and bring forward effective teaching methods.
The practice allows you to build on past successes and make informed improvements, helping you stay efficient and prepared.
Tips for Easy Access
A consistent naming convention is essential when managing multiple archived classes. Label each class with specific details, such as subject, year, and term (e.g., “Biology 2023 – Term 2”), so you can quickly identify and locate archived content.
The simple habit can save significant time when sifting through numerous archived classes.
If you need to bring an archived class back to active use, the option to “Restore” is readily available. This feature allows you to reintroduce a class to your active list, making it accessible for use without needing to recreate content.
Whether it’s for reusing assignments or sharing materials with a new class, restoring archived classes gives you flexibility and control over your course content.
5. Restore Archived Classes if Needed

If you ever need to bring back a class from the archived section to active status, Google Classroom provides an easy way to do so. Whether you need to access old assignments, review student work, or reuse materials, restoring archived classes is simple and quick.
Steps
| Step | Action | Description |
|---|---|---|
| Go to the Archived Classes Section | On the Google Classroom homepage, click the menu (three horizontal lines) in the top left corner. | Select “Archived Classes” from the menu to view all stored classes. |
| Locate the Class You Want to Restore | Browse through the archived classes list. | Find the class you want to restore. Clear naming helps in quickly identifying the correct class. |
| Click the Three Dots on the Archived Class | Click the three vertical dots next to the class name. | This opens a dropdown menu with options, including “Restore.” |
| Select “Restore” | Click “Restore” in the dropdown menu. | The class will move back to your active classes list, with all content, assignments, and student data intact. |
When to Use This Feature?
Archiving and then restoring classes is an efficient way for teachers to retain access to previously used materials, such as assignments, resources, or lesson plans.
The feature is particularly useful at the start of a new semester when teachers can quickly pull in content from previous classes, saving time on lesson planning and allowing them to reuse materials with minor adjustments as needed.
Restoring archived classes provides a valuable opportunity to review and analyze past student performance. Teachers can access full records of grades, feedback, and assignment submissions, which is useful when evaluating student progress over time or when using data to inform future instructional strategies.
Having this historical data readily available helps in refining teaching methods and identifying trends in student learning.
Things to Keep in Mind
Restoring an archived class doesn’t automatically re-enroll any students who were previously removed. If students were unenrolled before the class was archived, they will not have access when you restore it.
It is important to consider if you’re restoring a class with the intention of giving current students access to previous materials, as you may need to manage enrollments manually.
After restoring an archived class, it’s helpful to review its structure and content to ensure it’s ready for use. Certain materials may need updates to reflect current course objectives, and outdated resources may require refreshing or replacement.
Taking a moment to reorganize and update the class ensures that it’s optimized for the new semester and meets current teaching goals.
6. Reuse Content from Archived Classes
Once your class is archived, one of the most valuable features is the ability to reuse its content. Whether it’s assignments, posts, or announcements, Google Classroom allows you to efficiently bring past resources into new classes without needing to recreate everything from scratch.
Steps
| Step | Action | Description |
|---|---|---|
| Go to the Class Where You Want to Reuse Content | Navigate to your active classes and open the class where you want to pull in content from an archived class. | Access the desired class to begin reusing content. |
| Click the “Reuse Post” Option | Click the “+” button (Create) and select “Reuse Post” from the dropdown menu. | This allows you to pull posts, assignments, or announcements from any of your archived classes. |
| Select the Archived Class | A list of all your classes, including archived ones, will appear. | Scroll down and choose the archived class with the content you want to reuse. |
| Pick the Specific Post or Assignment | Inside the archived class, you’ll see all posts, assignments, and announcements. | Select the item you want to reuse, and it will be copied into your active class. |
| Edit and Customize if Necessary | Edit details, due dates, and other information after reusing the content. | This step ensures the material is updated and tailored for the current term, saving you time. |
Where Is This Useful?
Reusing content is invaluable when teaching the same or similar units in different semesters. If you’ve crafted effective resources or assignments previously, reusing them allows you to introduce tested material without the need to recreate it from scratch.
Each class has unique dynamics and needs, so being able to reuse and modify content is especially useful. By pulling posts or assignments from past classes, you can customize them to suit different student groups.
This way, you keep the core content intact but make adjustments to fit varying skill levels, interests, or specific learning objectives of each class without starting from a blank slate.
Key Benefits
Reusing content is a major time-saver, particularly for teachers handling multiple classes or sections with similar curricula. Instead of spending hours preparing new assignments or instructional materials, you can rely on a library of past resources.
That leaves more time for planning other activities, refining content, or focusing on individual student needs.
Reusing resources helps ensure that all classes have access to the same high-quality content.
Through maintaining a consistent approach, you avoid discrepancies in the curriculum across different classes, streamlining lesson planning and enhancing the learning experience.
The consistency reinforces key concepts, promotes uniform standards, and simplifies tracking student progress across classes.
FAQs
Last Words
Archiving a Google Classroom is a simple yet crucial process for keeping your digital space organized while preserving essential materials for future use, like on Quizizz. By following the steps outlined in this guide, you can confidently archive classes, access them when needed, and reuse valuable content without any hassle.
The key is understanding how to manage archived classes effectively, ensuring nothing important gets lost along the way.